How to install Toyota Techstream v12 on Windows 7 Pro 64bit
Part 1.How to install Toyota Techstream v12 on Windows 7 Pro 64bit
Part2.What is the CHEAPEST way to add Toyota smart keys?
How to install Toyota Techstream v12 on Windows 7 Pro 64bit
Fair warning: I would not consider this a good investment for someone who does not have a fair degree of tech skill, both when it comes to understanding computers (particularly manual driver installation and USB-based communications) and the Toyota TechStream software itself.
First and foremost: The mini vci cable worked perfectly well for me on a 2017 Sienna SE, using TechStream version 12.x.127 (the current release as of the date of this post), based on a Lenovo ThinkPad T500 running Windows 7 Pro 64-bit. However, in order to get to that point, I found myself using a different interpretation of the instructions another buyer ('DuckDivesInWater') provided in their review. I have no doubt the difference was caused by the fact I'm using a late version of TechStream.
PLEASE NOTE: The instructions below are based on a 64-bit OS. THE PROCESS FOR A 32-BIT SYSTEM WILL BE DIFFERENT.
1). Do NOT try to install the software on the CD directly if you're running a 64-bit OS! I guarantee it will fail. Horribly. Also, my antivirus software (ESET Smart Security) threw a fit about several files on the CD being contaminated with a trojan. I believe this to be a false positive, caused by the type of anti-hacking application packager the device's manufacturer (XHorse Electronics, out of China) used to bundle the software together, but be careful no matter what. Google search is your friend!
I will add that, after manually unpacking and installing the device driver, I had no other problems and no sign of virus or trojan infection.
2). Start by installing whatever version of Toyota TechStream you plan to use. Plenty of info on the Internet to help you out with that.
3). Copy the file “MVCI Driver for TOYOTA.msi” from the 10.10.018 folder on the CD to a temporary directory of your choice.
4). Open a command prompt window and change to said temporary directory. Extract the contents of the .msi file with this command (be sure to INCLUDE the double quotes where shown):
msiexec /a "C:\temp\MVCI Driver for TOYOTA.msi" /qb TARGETDIR=c:\temp\mvci
5). Once that's done, delete the 'MVCI Driver for TOYOTA.msi' file so it doesn't get run by accident.
6). Close your command prompt window. In Windows Explorer, go to C:\Program Files (x86) and create a new folder under it called "XHorse Electronics". Change to that folder and create another called "MVCI Driver for TOYOTA TIS".
7). Next, copy the whole content of c:\temp\mvci (or whatever temp directory you used to extract the .msi into) to "C:\Program Files (x86)\XHorse Electronics\MVCI Driver for TOYOTA TIS"
8). Plug your Mini VCI cable into a USB port. Windows may complain that it couldn't install the driver. Ignore any such errors for the moment.
9). Open Device Manager and locate the failed item in the hardware list. It should be easy to spot, as it will have a yellow exclamation point overlaying it. You'll probably see it under 'Other Devices.' Right-click on the device, select 'Update Driver' and 'Browse my computer.' Point the wizard to the folder you created in step 7: C:\Program Files (x86)\XHorse Electronics\MVCI Driver for TOYOTA TIS
10). Note that you will likely need to do this twice, once for the VCI chip itself and once for the USB-to-serial-port translation. Point the second prompt at the same folder. Once the process finishes, you should see the two new devices in your hardware list.
11). In order for TechStream to recognize and use the Mini-VCI cable, you will need to add a registry tweak. Some Internet searching will probably turn up a pre-written file, called 'mvci-x64.reg' or you can create the file yourself with a text editor as follows:
Windows Registry Editor Version 5.00
[HKEY_LOCAL_MACHINE\SOFTWARE\Wow6432Node\PassThruSupport.04.04]
[HKEY_LOCAL_MACHINE\SOFTWARE\Wow6432Node\PassThruSupport.04.04\XHorse - MVCI]
"Name"="XHorse - MVCI"
"Vendor"="XHorse ELECTRONICS Co.,Ltd."
"ConfigApplication"="C:\\Program Files (x86)\\XHorse Electronics\\MVCI Driver for TOYOTA TIS\\FirmwareUpdateTool.exe"
"FunctionLibrary"="C:\\Program Files (x86)\\XHorse Electronics\\MVCI Driver for TOYOTA TIS\\MVCI32.dll"
"APIVersion"="04.04"
"ProductVersion"="1.1.0"
"ProtocolsSupported"="J1850VPW:1, J1850PWM:1, CAN:1, ISO9141:1, ISO14230:1, ISO15765:1"
"J1850VPW"=dword:00000001
"J1850PWM"=dword:00000001
"ISO9141"=dword:00000001
"ISO14230"=dword:00000001
"CAN"=dword:00000001
"ISO15765"=dword:00000001
"SCI_A_ENGINE"=dword:00000000
"SCI_A_TRANS"=dword:00000000
"SCI_B_ENGINE"=dword:00000000
"SCI_B_TRANS"=dword:00000000
12). Finally, run Techstream. Go to Setup | VIM Select menu and select the “XHorse - MVCI”
You should now be able to connect to your car's OBD port and use TechStream just as your dealer's tech would. Be careful not to change anything you're not familiar with! It's too easy to screw something up.
My thanks to 'DuckDivesInWater' and 'JHood' on the ft86club dot com forums.
Happy tweaking.
Part2.What is the CHEAPEST way to add Toyota smart keys?
There are optional solutions to make new keys to Toyota with Techstream software or some auto key programmers. Some by the dealer, some diy. Here, you will get the cheapest way to make it.
The Options
A.) Pay the dealership.
This was quoted at
~$400. I called 2 local dealerships (I'm in the GTA) and was quoted 2 different prices, with the second dealership referring me to an agent (which I had previously found online).
B.) Pay an agent / locksmith
This was quoted at
$250 but I've only found 1 so far. I was told it was an OEM part and would have 6 months of warranty.
Any referrals in the GTA would be much appreciated.
Edit: After a number of calls, the cheapest I could find was $180 and $200.
C.) Partial DIY
I see that I can buy the Smart Key online for
about $110 and bring it to a dealership or agent/locksmith to have it programmed into the car. I was quoted $50 by the dealership.
Any referrals to purchasing OEM Smart Keys online would be much appreciated.
Edit: This option can be very highly "YMMV" as each dealership's policy may differ regarding used keys (some may do it, some may do it but fail, and others may opt not to do it at all)
D.) Full DIY
If you have a laptop, Techstream software, a connecting cable, and the Smart Key, you can DIY. Its unclear whether the "Ignition Key" portion can be DIY with Techstream (someone please clarify). If you cannot, this seems to defeat the benefit and would seem more beneficial to pursue the Partial DIY option above.
The Techstream software is referred to as
$20 or less on the obd2 shops like
http://www.obdexpress.co.uk/wholesale/cheap-mini-vci-single-cable-for-toyota-26728.html ($20 around to get
"Techstream" and "Mini VCI")
The website for Techstream shows a subscription model with varying options. I've looked at few posts in the forums but overall am lost on the full DIY option.
Confirmed possible! Requires a SEED code calculator which is another $15 for 1 code.
E.) Ski-Mask Approach
According to this post: https://www.rav4world.com/forums/96-4-3-general/185994-scary-news-smartkey-owners.html, all this can be avoided for the low low price of
$17. (joking)
Conclusion:
The cheapest should the fourth solution: full do it yourself to make a new key.
Here is the how-to’s for reference.
You should have:
Smart Key: The circuit board # inside the to-be-programmed Smart Key matches your existing key(s).
Techstream: You should be able to run the program without an error appearing. There is typically a manual step to have the program launch properly
(modify IT3System.ini, "TISFunction = 1" to "TISFunction = 0")
MVCI Cable: When you plug it into your PC, you should hear the iconic "ding" sound. If you don't, it would suggest a lose connection
(I experienced this and had to open up my cable to get it working). You should also launch the "XHorse Firmware Update Tool"
(it comes with the cable's drivers) and click "Device Info", which will confirm whether it can communicate with the cable or not
(for this check, it does not need to be plugged into the car, only to your PC)
Here you go...
Procedure:
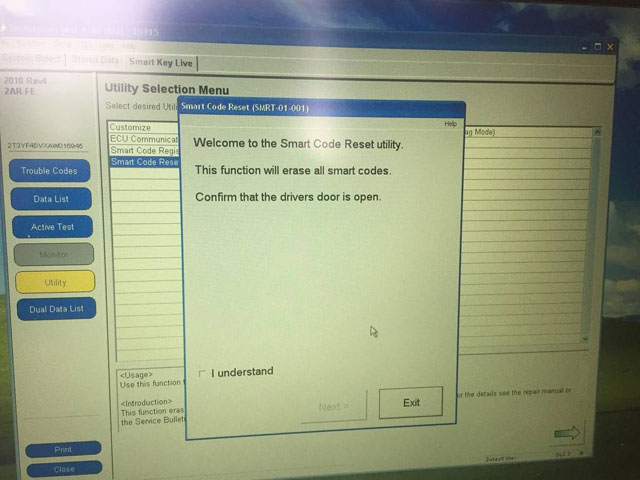
Once you have everything ready to go, start your car and launch Techstream. Leave the driver's door OPEN for the entire duration.
Click
"Connect to Vehicle"
Note: As the procedure I'm running through takes about 20 minutes total, its recommended to have the car running to ensure the battery doesn't drain out. If you can't start the car, its mentioned in other bulletins to have the car hooked up to a backup battery
Techstream should automatically detect your car
(mine was a 2010 RAV4, ignore the details in the image, its just for reference), except for an option or two
(I had to indicate "/w Smart Key" functionality and that my car was "2WD")
After a while, you will arrive at the System Select page. I suggest you copy-paste your VIN# to Windows notepad so that you have it handy later (applicable for
used Smart Key registration only)
All of the ECUs will be yellow. You can click "Health Check" to have Techstream go through each of the ECUs and determine its status, which takes a few minutes and will change their colour. If you decide to skip the "Health Check", you can still click on the individual ECU you're looking for and it will read only that specific ECU
(you'll be waiting a few seconds instead of minutes, its basically the same as the "Health Check", but only for that ECU).
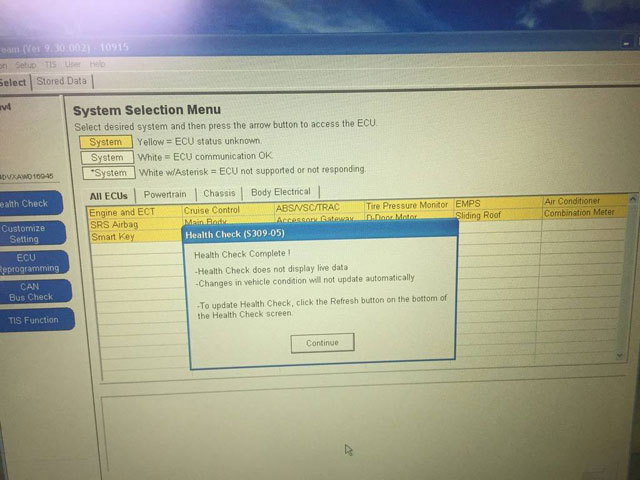
The ECU I needed was labelled
"Smart Key" (2010 RAV4, if your vehicle differs, so may your options)
Once in there, select
"Utility" on the left-hand side and you will arrive at this screen.
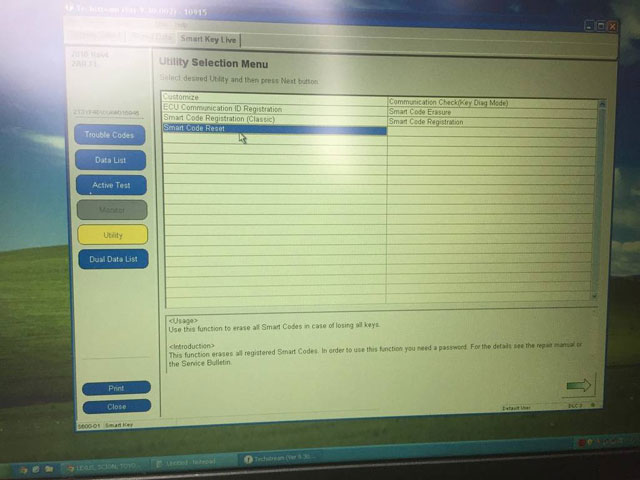 NEW SMART KEY
Now, if you had a NEW Smart Key, the process is relatively straight forward. You can simply click on the "Smart Code Registration" option, which there are 2 of. Both options work, the Classic is older and has less explanations, while the new one has more text and is more user-friendly.
The steps basically consist of; 1.) only have 1 Smart Key in the car at a time, 2.) first start with the Master Key (existing key) and tap it on the ignition button, 3.) remove the key
(more than 1 meter from the car) and bring the NEW Smart Key inside, tap it on the ignition button. 4.) Place the NEW Smart Key on the passenger seat until prompted otherwise. 5.) Done.
All of the steps need to be done within 30 seconds of each other, as indicated on the screen (there will be a counter counting down).
USED SMART KEY
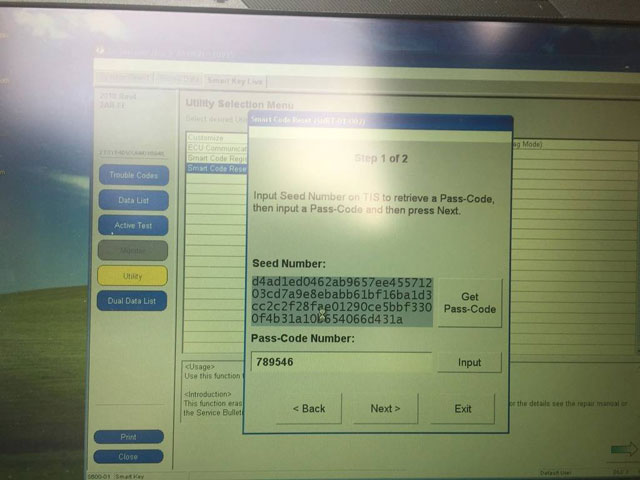
The only option that appears to work is the "Smart Code Reset" function. I tried a number of different things but I couldn't get the used Smart Key to register under any of them except this one (which requires a SEED code, $)
Within the "Smart Code Reset" function, you will arrive at this screen.
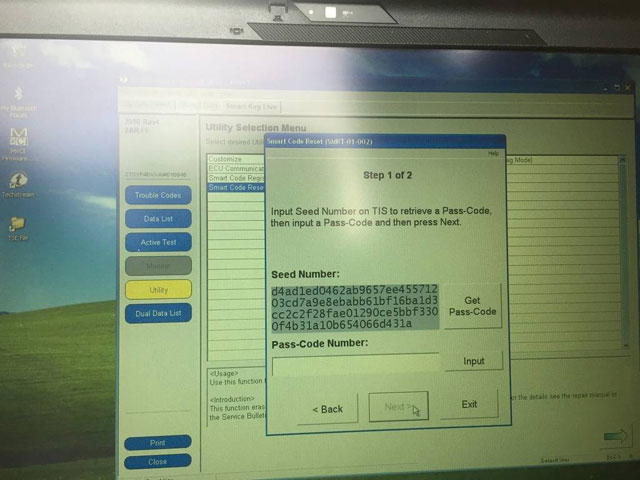
You can click on the
"Get Pass-Code" button, which will take you to another screen that allows you to copy the 96-digit SEED code
(the first one doesn't seem to let you copy, despite being able to click on it).
IMPORTANT!
Do not close the Techstream window that has the SEED code displayed (the first one).Techstream generates a new SEED code every time you enter the function, so if you close out of it, you lose that session. If you re-enter it, a new SEED code will be supplied and any SEED passcode you received from a calculator will be useless
(you can't re-open a previous session).
NOTE: While you may read in Techstream that its recommended to avoid having wireless devices such are cell phones or your PC's WiFi on when registering Smart Keys, I had my laptop with WiFi turned on for the entire process and didn't encounter any issues or interference. With respect to supplying a calculator with your VIN# and SEED code, I would highly recommended that you do all of it through copy-paste instead of manually typing. This would help you avoid any unintentional typos
(as that would end up costing you money for a new SEED passcode).
You now need to go to one of those "calculator" websites I mentioned
(www.Pin-Online.net (was $15 USD) or www.weboctopus.nl (25EUR for 5 codes) and paste your VIN# and SEED number. When I used weboctopus.nl, the 6-digit passcode was generated instantly.
Reminder #1: Do not close the Techstream window that has the SEED code displayed (the first one).
You can then go back into Techstream and paste the code in.
Reminder #2: Remember to leave the driver's side door
OPEN. Do not close it as it will interrupt the reset procedure. If the function fails for whatever reason, DO NOT CLOSE THE DRIVER'S DOOR. You may still be able to try again or carry through with the remaining steps successfully
(other post's have reported so).
You will then arrive at this screen, where you simply wait for 16 minutes.
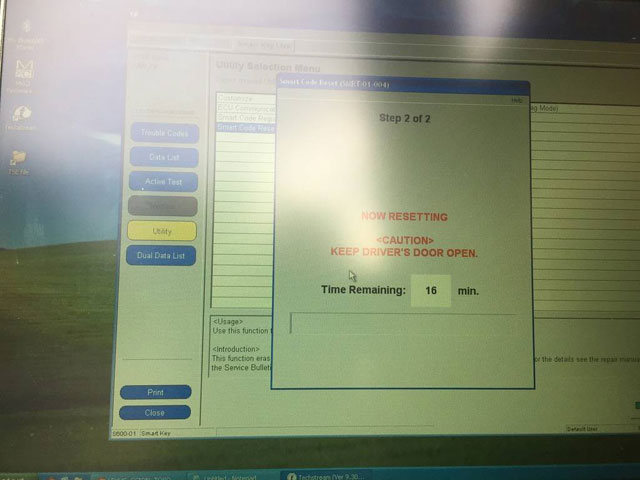
I suggest you stay nearby
(I was playing a game on my phone) and set an alarm a minute before you expect the timer to end and avoid touching or moving anything
(I left the laptop on the car seat and sat on the ground outside, most specifically because my particular cable was defective and had a loose connection, so I wanted to avoid any movement that may risk losing the connection).
Once the timer ends, it will tell you the procedure is complete (successfully)...
but you're not done yet!
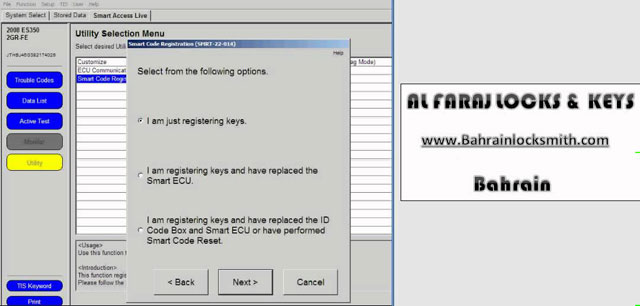
In order to register your keys, you now need to select one of the other options (I chose "Smart Code Registration (Classic)").
Note #1: Previously, if you used this function, you'd choose the first option ("I am just registering keys") but it would fail if you were trying to register a
used Smart Key. Now you will select the third option instead.
Note #2: In case you're curious, choosing the third option before performing the "Smart Code Reset" will simply result in an error before you even get to load the function. It will produce a message to the effect of "Cannot initialize, reset function not detected".
 (ignore the locksmith bit, I couldn't find a better picture but will try to upload another one, with the correct option selected)
Here, you will select the third and longest option "I am Registering keys and have replaced the ID Code Box and Smart ECU
or have performed Smart Code Reset"
When you hit next, you will be asked to eventually tap the key on the ignition button. It has been recommended by other users that the USED key be tapped first and any existing (previously linked) keys to be tapped last.
After this is done, you can click "Register" to finalize the session.